Introduction
If you’ve ever wondered what happens between the moment you hit kubectl apply -f and the moment your pod actually starts running, you would need to understand the Admission Controller lifecycle.
In Kubernetes, the API Server is the only gateway to the cluster’s state. But just because a request is “valid” YAML doesn’t mean it’s “right” for your cluster. Admission controllers are the gatekeepers that ensure every request follows your specific rules for security, governance, and configuration.
Let’s understand the API request flow from the moment it gets triggered by the client (such as Kubectl) and gets persisted into the Kubernetes database (etcd)
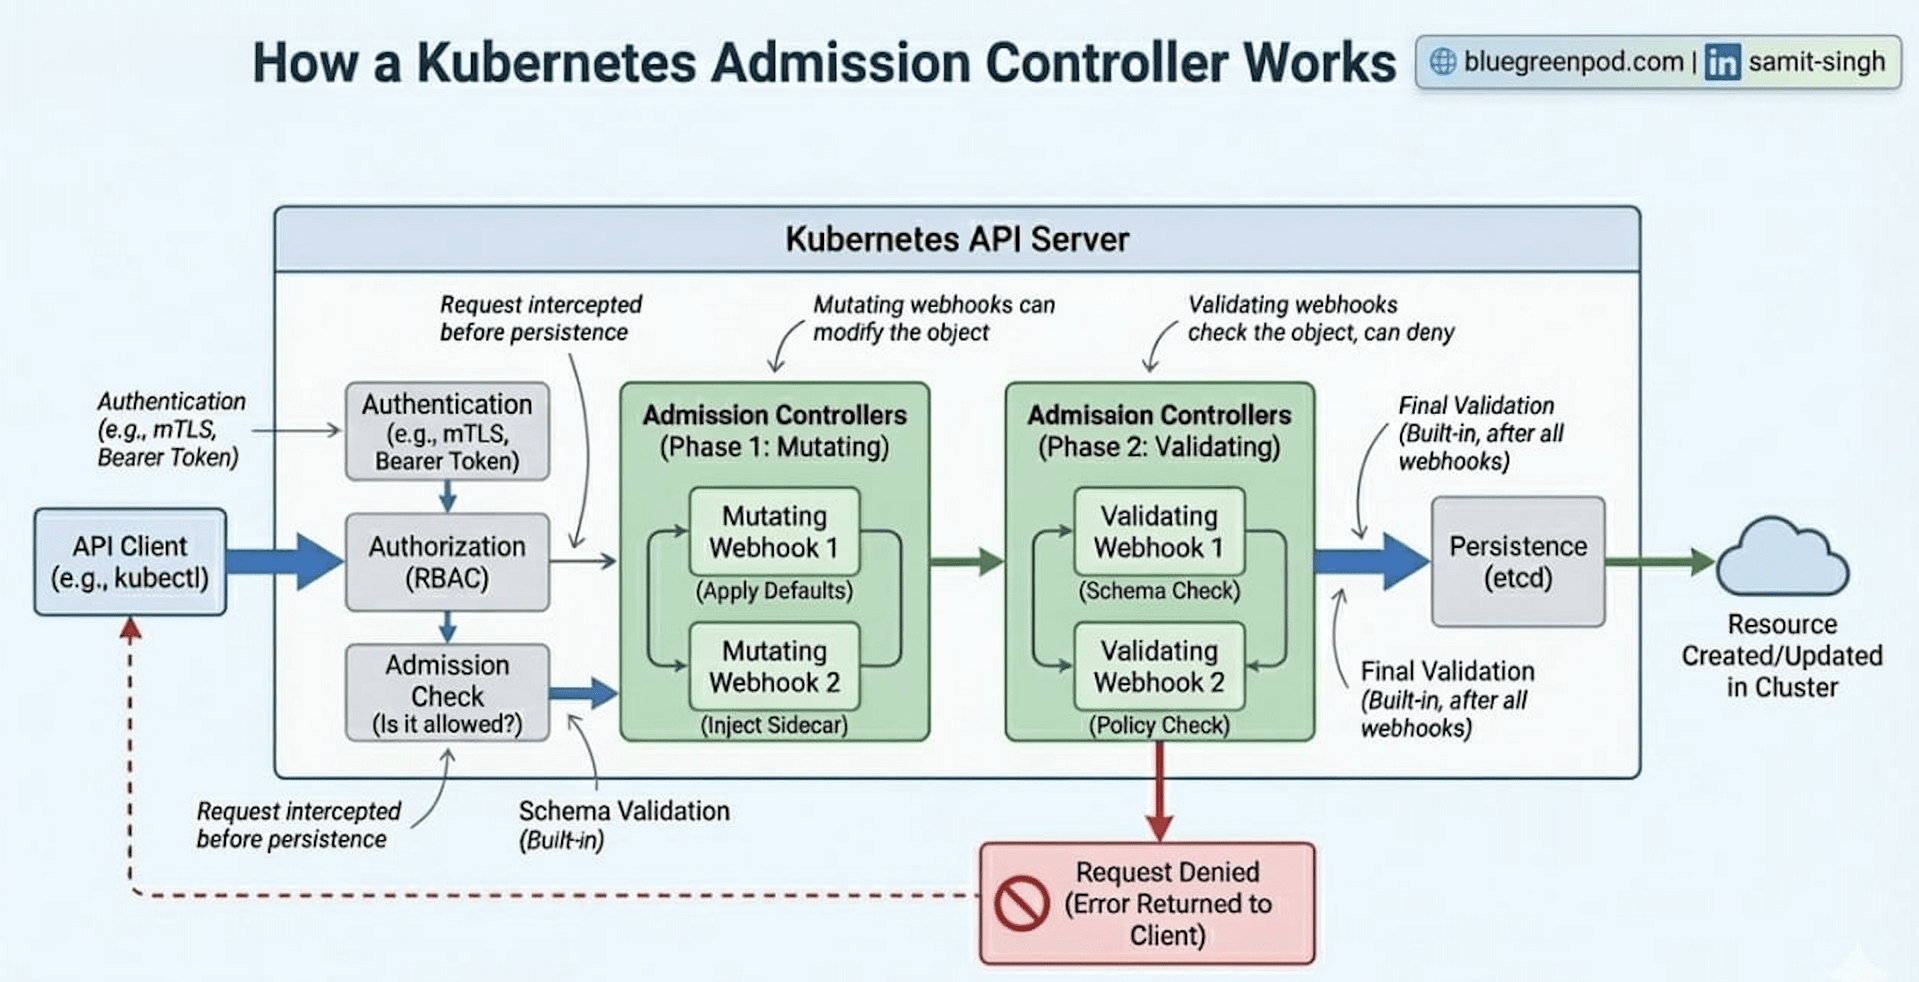
1. The Entrance: Authentication (Authn) & Authorization (Authz)
Before the admission process even begins, Kubernetes needs to answer two fundamental questions:
Authentication (Who are you?)– Verifying your identity via client certs, tokens, or OIDC.Authorization (Are you allowed to do this?)– Checking RBAC permissions to see if yourUserorServiceAccounthas the the required permission i.e.createverb for thepodsresource.
If you fail either of these, the request is rejected with a 401 Unauthorized or 403 Forbidden immediately.
2. Phase One: Mutating Admission
Once you’re through the door, the request enters the Mutating Admission phase. This is arguably the most active part of the process.
Mutating controllers have the unique ability to modify the object. Why would you need this?
Enabling default behavior: If a developer forgets to define resource limits, theLimitRangercontroller can automatically inject them.Sidecar Injection: This is how service meshes likeIstioorLinkerdwork. They use a Mutating Webhook topatchyour Pod spec on the fly, adding a proxy container without the developer ever writing it in their YAML.Security: Automatically settingallowPrivilegeEscalation: falseor such other critical attributes if it wasn’t specified.
Note: According to theofficial K8s documentation, mutating controllers run
sequentially. This is important because one controller might change a field that a subsequent controller needs to see.
3. The Sanity Check: Schema Validation
After all mutations are finished, the API server does a Schema Validation.
Think of this as a checkpoint. Because mutating webhooks can technically change any part of the request, Kubernetes needs to make sure the final version of the object still makes sense. If a webhook accidentally turned a string into an integer or broke the structure of the Pod spec, the request is killed here before it can do any damage.
4. Phase Two: Validating Admission
Now that the object is in its final form and will not change again, it passes to the Validating Admission phase.
Unlike the mutating phase, these controllers are read-only. They cannot change the data; they can only Accept or Reject the request based on policy.
Standard Controllers: For example, theResourceQuotacontroller checks if creating this Pod would push the namespace over its allowed CPU/Memory limit.Custom Policies: Many organizations use tools like OPA Gatekeeper or Kyverno. These act as Validating Webhooks to enforce custom business logic, such as: “Reject any container image that doesn’t come from our private corporate registry.”
Unlike mutating controllers, validating controllers can run in parallel to speed up the process, as they don’t depend on each other’s changes.
5. Persistence: The update in the database
If the request passes the checks of validating controllers, it reaches the final stage: etcd.
The API Server performs one last internal check and then persists the object into the etcd database. Only at this point is the resource considered created. The various controllers (like the Scheduler or the Deployment controller) will then see this new entry in etcd and begin the work of actually spinning up your containers.
Important for debugging
Understanding this flow is a superpower for troubleshooting. If your Pods are appearing with mysterious containers you didn’t add, check your MutatingWebhooks. If your kubectl apply is being rejected but your YAML looks perfect, a ValidatingWebhook is likely the culprit.